Campaign Settings
What are campaign settings?
This guide will walk you through the Campaign Settings in Trust. This enables you to customize and optimize your campaigns for better performance and impact to your audience.
Read the guide below to have a better understanding of the campaign settings and maximize the effectiveness of your campaigns.
General tab
The General tab contains most of the settings needed to set up a campaign. This is where you can set the campaign name, schedule, form, and this is where you can enable or disable your campaign.
1. In the Automate section, navigate to the Campaigns menu.

2. Click on an existing Campaign. If there are no existing campaigns, follow this guide [insert URL] to create a campaign.

3. Displayed under the General tab are the necessary settings to create and test a campaign.
- Name - This is the name of your campaign, this is a required field.
- Active - Toggle to enable or disable your campaign.
- Schedule - There are 3 options you can select for when you want your campaign to run. These are Weekdays, Weekends, and Anytime.
- Schedule Time - This is a drop down menu where you can select the time you want to run your campaign.
- Select Form - The form you want to use on your campaign. This is a required field.

Add a Message to a Campaign
How to add a message to a campaign?
Follow the guide below to easily create a message for your campaign.
1. In the Automate section, navigate to the Campaigns menu.

2. Click on the desired campaign you want to add a message.

3. Navigate to the Messages tab.

4. Click on the Add Message button.

5. Fill up the fields under the General page:
- Delay in Days
- Subject
- Body Text (Important: Please read and follow the notes below the text area)

6. Click on the Save settings button.

7. Ensure that the added message is successfully displayed on the campaign.

Edit a Campaign Message
How to edit a message to a campaign?
After a message has been created, this can always be updated to refine your message or make updates. Follow these simple steps to ensure your message aligns perfectly with your campaign goals.
1. In the Automate section, navigate to the Campaigns menu.

2. Click on the desired campaign you want to add a message.

3. Navigate to the Messages tab.

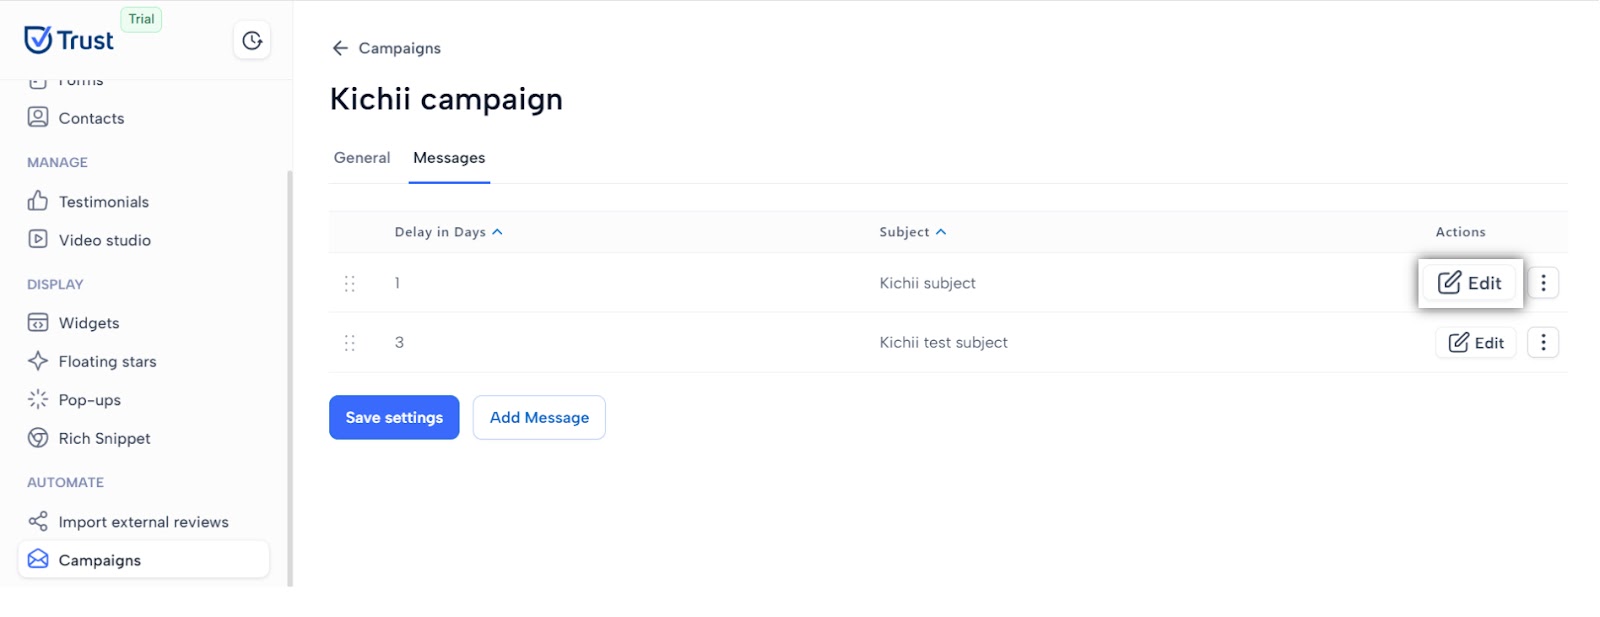
4. Click on the Edit button under the Actions column of the selected campaign message.

5. Under the General page, make any necessary changes by updating on any of the fields on the campaign message as needed:
- Delay in Days
- Subject
- Body Text (Important: Please read and follow the notes below the text area)

6. Click on the Save settings button once satisfied with the updates.

7. Click another Save settings under the Messages tab.

Delete a Campaign Message
How to delete a message to a campaign?
If a campaign message is outdated, confusing, or no longer impactful on the audience, these messages can be deleted. Follow the guide below to easily delete a message from your campaign. This may prevent mixed messages, reduce audience frustration, and raise overall engagement.
1. In the Automate section, navigate to the Campaigns menu.

2. Navigate to the desired campaign you want to delete a message.

3. Navigate to the Messages tab.

4. Click on the ⋮ button beside the Edit button.

5. Click on the Delete option.

6. Click the Delete button on the Caution prompt.

7. Ensure that the message is successfully removed on the campaign.

Send Test Email
How to send a test email on an edit campaign message?
A test e-mail is also a great opportunity to test how well the new message will be perceived and if some final fine-tuning could be made in accordance with its consistency with the broader campaign goals.
1. In the Automate section, navigate to the Campaigns menu.

2. Click on the desired campaign you want to add a message.

3. Navigate to the Messages tab.

4. Click on the Edit button under the Actions column of the selected campaign message.

5. Under the General page, make any necessary changes by updating on any of the fields on the campaign message as needed:
- Delay in Days
- Subject
- Body Text (Important: Please read and follow the notes below the text area)

6. Click on the Send Test Email button.

7. Fill up the fields on the Send Test Email prompt:
- First Name
- Last Name

8. Click the Send button on the prompt.

9. Ensure a success message is displayed after sending a test email.

