How to Format, Add Transitions, and Thumbnails to Your Video Testimonial
In this guide, we'll walk you through how to format your video, add smooth transitions, and create a custom thumbnail to enhance your video testimonials. By following these simple steps, you can ensure your video looks polished, professional, and ready to make a lasting impact on your audience.
Step 1: Access the Video Editor
- Log in to your Trust App account.
- In your dashboard, navigate to Video Studio.

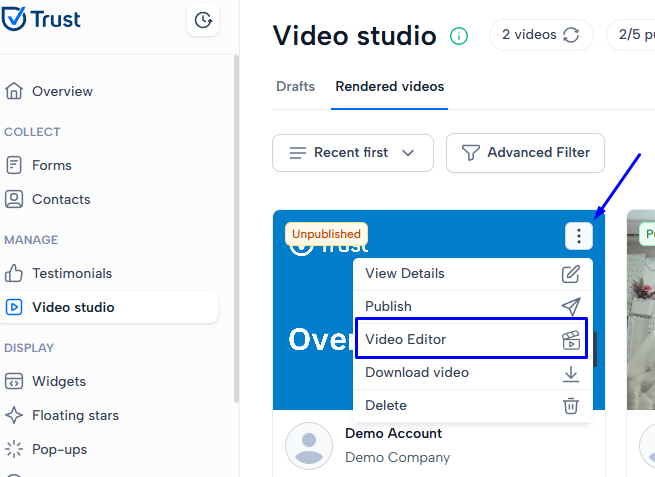
- Find the video you want to edit, click the three dots next to the video, and select Video Editor.

Step 2: Format Your Video
To ensure your video displays properly across different platforms, you can adjust its format. Here's how:
- In the Video Editor, click on Video Preview to access the customization tools.
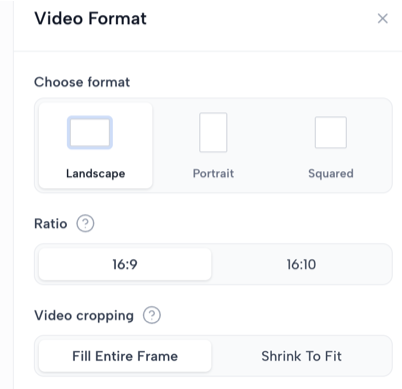
- Click Format to choose from the following options:
- Landscape
- Portrait
- Square
- Once you select your format, choose the appropriate Aspect Ratio based on your format.
- You can also adjust Video Cropping:
- Fill Entire Frame (to ensure the video fills the frame)
- Shrink to Fit (to ensure the entire video fits within the frame without cropping)

Note: Any changes you make will be automatically saved.
Step 3: Add Transitions to Your Video
Transitions can make your video flow more smoothly from one scene to another. To add a transition:
- In the Video Editor, click Transitions.
- Choose from one of the following transition effects:
- Scale Side
- Scale Centered
- Fade
- Wipe
- Select your preferred transition speed.

The transitions will automatically be applied once you've made your selections.
Step 4: Add a Thumbnail
A custom thumbnail can significantly increase the appeal of your video, encouraging viewers to click and watch. Here's how to add one:
- In the Video Editor, click Thumbnail.
- You have two options to choose from:
- Upload a Thumbnail: Select an image file from your device.
- Select a Video Frame: Pick a frame from your video to use as the thumbnail.

Step 5: Render the Video
After formatting your video, adding transitions, and selecting a thumbnail, you’re almost ready to go live!
- Click Create Video to render and finalize your video testimonial.
- Your video will be processed, and you’ll be able to download or share it once complete.
If you need any help importing your testimonials, please contact us in the live chat or email support@usetrust.email!

